Monday, September 17, 2012

A New Tag!

I made this tag a couple days ago and havent had the chance to type it up! nows my chance so heres a look at my new tag!

 
All the tags I have posted on my blog so far, have a simple design. but out of that simple design makes a beautiful tag that you can change so much details on to make your own. to embellish this tag all I used was a idea-ology word band, a piece of twine, a flower and a little pearl for the middle of the flower. the background on this tag took the most time because theres so many layers. so ill show you how I made this tag!


I started with a blank tag and some distress ink in the colors Vintage Photo, and Peeled Paint.


I used a ink blending tool to blend both of the colors onto the tag. as you can see above, I put peeled paint in those spots, then I blended vintage photo into the blank spaces. after the whole tag was colored with ink, I Built up the color intensity so both of the colors were bold. then, I sprayed the tag with water so all the colors were blended nicely, then i let the colors drip to the side leaving the middle a little lighter than the edges as you can see from the picture below, then I dried it with a heat tool.


Then I took a sponge with lots of interesting texture, and dipped it in one of the new Distress Stains in Brushed Pewter, and I stamped the sponge on different parts of the tag. Then i took the same sponge and dipped it in embossing ink and stamped it on the tag, then I took a gold embossing powder and sprinkled it over the ink, and Heat it with a heat embossing gun. After those steps, the tag looked like this.


Then i used the martha stewart stencils ( regularly used for paints) and i place it on the tag. then i used vintage photo distress ink and a blending tool to transfer the design onto the tag. after this step is down in several areas, the finished background of the tag should look like this below.

( where you heat embossed, the ink wont stick to it very well so it leaves a cool rustic effect.)

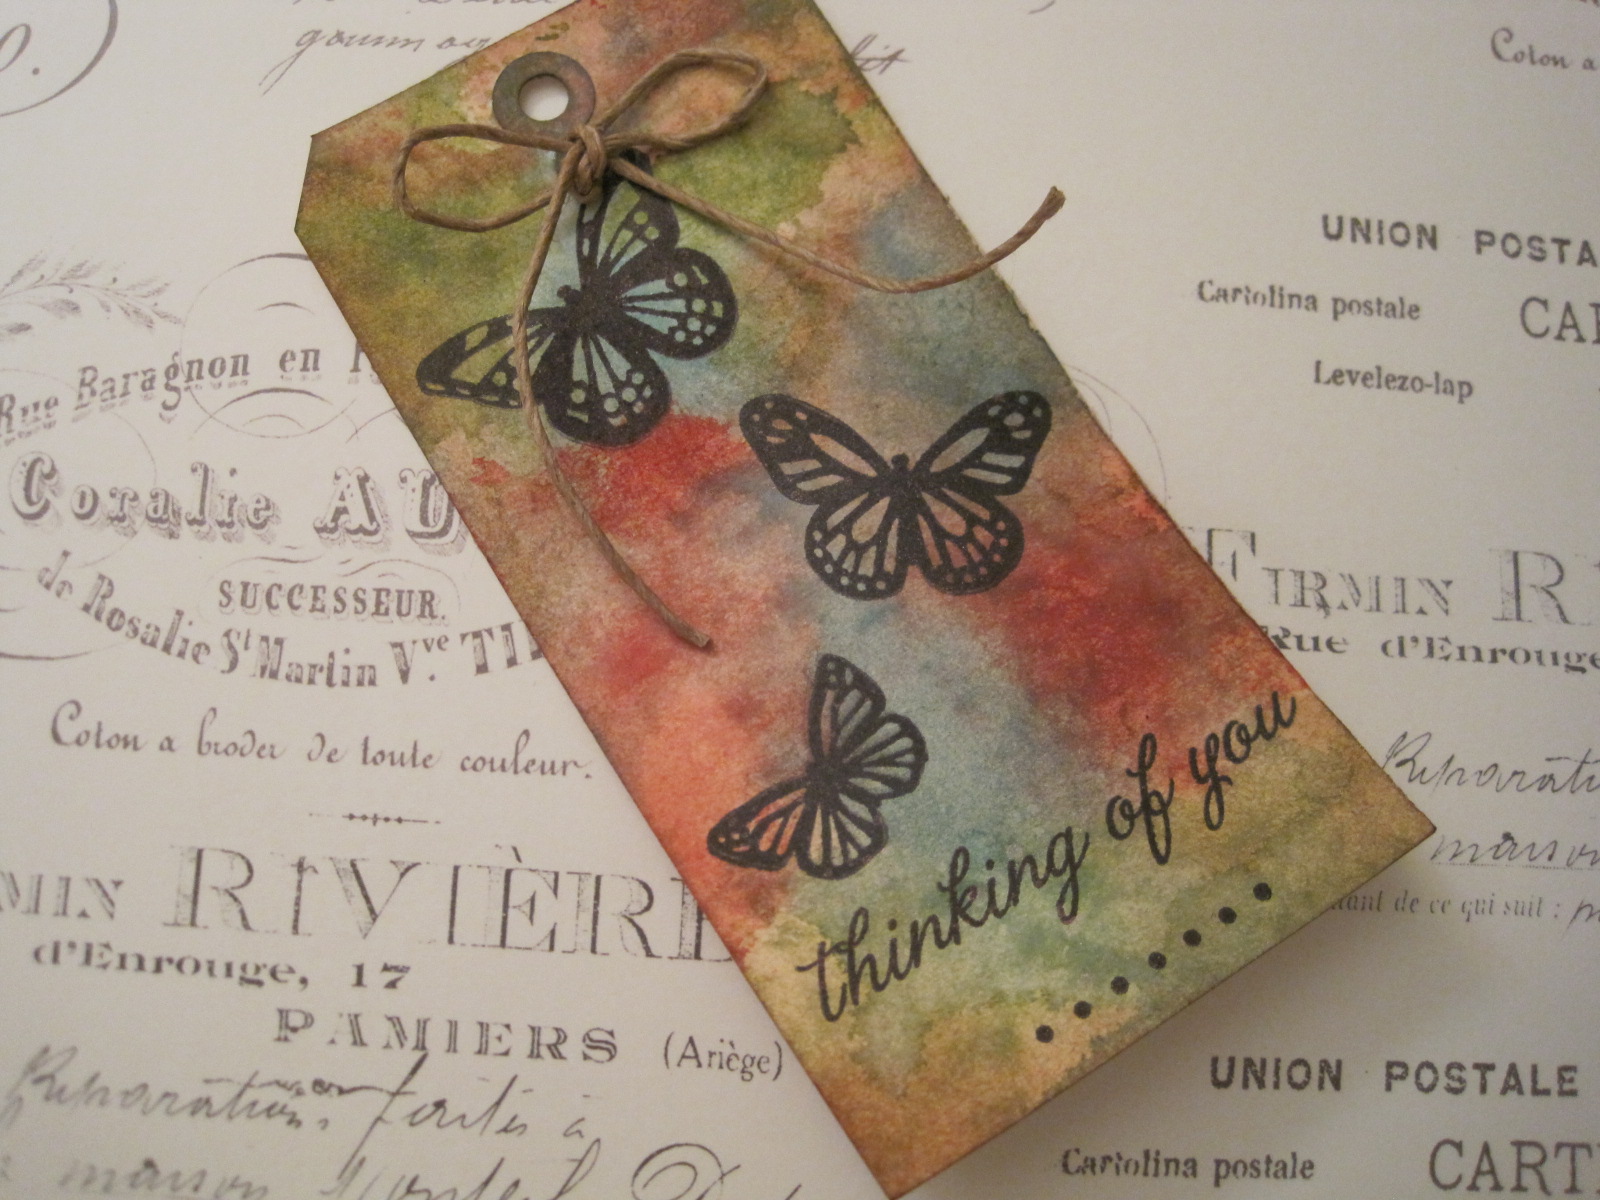
Now its time to embellish! I placed a yellow flower on the top left corner and a pearl in the middle of the flower, and used a hot glue gun to glue it down then I used some twine and placed it in a spiral pattern down and at the end of the twine I placed a word band. the finished product looked like this below.


So this tag, super simple to recreate! and the background itself makes a big impact. theres lots of varaitions you could do to this tag just by changing the colors or the embellishments you could have a completly different tag! the next tag will be a little more complex so check back here next time for more!

Thanks for checking out this blog! I hope you come back! were now in the middle of september! i cant belive how fast this year as gone by! I cannot wait till October 1st to see tims new tag!


You can follow me on pinterest! my username is ktlove4art.

Thanks! Heres some more pictures of this tag!


Monday, September 10, 2012

Whats in my Trinket Case?

In my craft room, Ive always thought my organization was pretty good. I use a system of cubes that you can put together to make a unit, and you can find them at craft stores. In one of those drawers, i keep most of my embellishments for projects. I kept the packages for everything so nothing was just floating around in the bottom of the drawer, and after awhile of collecting more and more embellishments, the drawer kept getting fuller and fuller, untill finally I couldnt get anymore stuff in there! So I said to myself, I need a better system of organization.

I remember seeing that Idea-ology came out with a few storage ideas that were made espically for storing different things. I bought the Trinket Case and it looks like this below!


 I filled this case with most of my embellishments and theres room for more! This case is super handy and I can just sit this on on my table and grab it whenever I need it! So I wanted to show you guys how I organized my stuff in this trinket case!


This is what the case looks like after you unlatch the hooks.


This is the first layer of drawers and on the top, I put most of my fasterners that I have, like, some mini clips and some idea-ology hinge clips and hangers.

On the bottom right, I put, what I like to call, my"steampunk stuff" like some idea-ology gears and word bands

And on the bottom left, I put some clock hands and clock faces!


This is what it looks like when the whole unit is open. In the middle on the left I have some foundations and a spot full of metal rings and things of that nature.

On the middle right I only have some vintage letter blocks, and a empty space.

On the very bottom I have some Tim Holtz Idea-ology, tissue tape, ruler ribbon, 2 tins of film ribbon, and some minature bottles. I also have some safety pins.

So thats whats in the trinket case I bought and honestly, I love this thing! It has saved me so much time by not having to dig though a messy drawer and it has saved me alot of space! Love it!

Thanks for Taking the time to read my blog! Thank you guys for all the nice comments on my Tim Holtz 12 Tags of 2012- Semtember entry! Much appriecited! Have a Great Monday!

I was not paid in any way to say that " i love this product" these are my personal opinions and were not influenced my anyone! -Kayla

Saturday, September 8, 2012

My Latest Tag


This is my newest tag! I created this tag a couple of days ago and it was super simple! The background is made from distress inks and the images were just stamps stamped with Black Archival Ink! but you could change this tag and make it you own in many ways. like you could emboss the butterflys with black embossing powder or, you could change the distress ink colors in the background! there are a million possibilities!! i will show you how i created this tag!


I started with a blank tag from ranger, and 3 colors of distress ink in Broken China, Barn Door and Peeled Paint.


I took the Distress Inks and put them on my craft sheet. Then I sprayed some water on the Inks and dipped the tag in the Ink, and swirled it around to get a cool marbled effect. The first layer of ink wasn't very bold, so i built up the color by using my blending tool dipped in the color of ink that wasnt very bright, and added more color to the tag until i liked the way it looked. I learned this technique from Tim Holtz, of course! If you want to check out the video that I watched, to learn this technique, click here!


These are the stamps that I used! All 3 of the butterflys are from the Martha Stewart Embossing Stamp Set that I purchased from Micheals. and the other 2 stamps are from a stamp set I got from Micheals as well. but unfortunatley, I dont remember what that set is called because i threw the package away. I then Stamped all the images down on the tag using Black Archival Ink.


Then I took some twine and made it into a bow, and glued it on! So now, its pretty much finished! its all about final details!


I took some Vintage Photo Distress Ink and distressed the tag around the edges.  I also distressed the edges with a paper distresser. And were done! So this was a pretty easy tag to accomplish! I hope you guys try to make a simpler tag, but "bling" it up and make it look amazing!

Heres a picture of all the products I used!


All of the inking techniques that I used on this tag are from and can be explained alot better by the amazing Tim Holtz! You can check out some video tutorials on the ink techinque on Tim Holtz's Youtube Channel or you could check out Tim Holtz's Blog!

Tuesday, September 4, 2012

12 Tags of 2012- September

In the crafting world, everyone knows the name Tim Holtz! He has a very large line of products with various companies that are all fantastic! He also writes a blog, and I have the website linked in the sidebar under "my favorite websites". 

Well if you follow his blog you may know that he does the "12 tags of 2012" where each month he posts a tag tutorial with a theme of a holiday that month, or just a new technique. He allows people to post their Sthat tags they created with that technique so other people can see your ideas! So I'm gonna show you guys the tag I created with the metal technique he used for the 1st of September!


This is a far away picture of my tag


( I'll list all the products I used at the bottom of this post )

I started out with one of Ranger's tags, and I dabbed distress ink down on my craft sheet using the colors Vintage Photo, Walnut Stain, and Peeled Paint. I also put one of the new metallic distress stains in Brushed Pewter. I sprayed the ink with water and dipped my tag into the ink untill it had a unique color pattern, then I dried it with a heat tool. Then I took some Broken China distress ink on a ink blending tool, and added the color in random areas. I spritzed the paper with water to blend it all out then  once again dried it with a heat tool.

 After the ink is all dried, I stamped the background of the tag with a writing stamp from recollections in random areas.

Tim's technique this month was a Faux Riveted Metal look. So instead of covering the entire tag with the Inkssentials Metal Foil Tape Sheets, I cut it into random pieces and crinkled it a little bit and placed them on my tag to try and make it seem like the ink is covering up the metal and the metal is only revealed in certain areas. I textured the metal with a pen tip and a needle tool, but you can really only see the texture up close.


Up close picture of the top part of my tag
Next, it was time to grab a bunch of embellishments! I put on some gears from the Tim Holtz collection and a mini light bulb I found in a drawer I also used a clip to attach a adage ticket.

Up close picture of the bottom half of my tag
 
On the bottom, I, put a pin attached with a spring and a few jump rings. then I attached a word band with ribbon from the Tim Holtz collection that reads "possibility begins with imagination" I love this quote! Lastly I stapled some film ribbon on the very bottom.

So that was my Tag and I hope you liked it! Here is a list of the tools and supplies that I used; you can find most of these things at a Micheals, Archivers or Hobby Lobby stores.


Craft Supplies
  • Ranger Tags
  • Distress Ink
    • Peeled Paint
    • Vintage Photo
    • Walnut stain
    • Broken China
  • A Vintage writing stamp from recollections ( i dont know what its called )
  • Archival Ink
    • Jet Black
  • Inksessentials Metal Foil Tape Sheets
  • Idea-ology Sprocket Gears
  • Idea-ology Word Bands
  • Idea-ology Adage Tickets
  • Idea-ology Film Ribbon
  • Idea-ology Hinge Clips
  • Adriondack Paint dabber
    • Snow Cap
  • Recollections ribbon
    • white
Tools

  • Ranger Craft Sheet
  • Matha Stewart Heat Gun
  • Hot Glue Gun
  • Ranger Mister
  • Stapler
  • Ink Blending Tool
  • Ink Blending Foam

Here are Some Extra Pictures!


Thanks for Reading my posts! make sure to check out Tim Holtz Blog and Make your own tag for his 12 tags of 2012!!

Click here to Go to Tim Holtz Blog


Monday, September 3, 2012

Welcome to my Blog!

I am so happy because this is my first offical blog post on Blogger! I have been wanting to make a blog for a long time and I'm so glad I finally did!

My goal for this blog is so many things, but most of all I want to inspire people! The things that I want to post on this blog are
  •  Tutorials on some projects / techniques that I use.
I want to show  how to make some of the projects that I like to do. Like tags, scrapbook pages, cards, and more. Also, I want to show you some techniques that I use to accomplish these projects like using inks, paints ect. Along the way, I might show some of the finished projects I have done that I don't show tutorials on, so you can take the ideas and make them your own!

Some tools / supplies that I use

In my blog I also want to show the tools that I have purchased over the years and give you my opinions on them. I also want to show you my supplies that I own, and show how I like to organize them.  Hopefully maybe you can get some great storeage ideas that can help you organize your own craft supplies.

So those are pretty much what my main posts are gonna to be about, or have somthing to do with.  The one thing you can count on is that each post will have somthing to do with Art. I'll come up with more ideas for blogs along the way...but for now, I'm sticking with the basics.

Like I mentioned eariler, my main goal is to inspire people! Whenever I read other peoples blogs or  tutorials on youtube, I always get new ideas.  Most of the time this inspires some beautiful pieces of work!

So Thanks for reading my blog and I hope you continue to check back here for new posts. I haven't established a schedule for when I will post a new blog, so just keep checking in!

If you have something on you mind or any questions or comments just let me know!