Monday, January 7, 2013

12 Tags of 2013-January!

Hello everyone!!!!!! Happy 2013!!! and you know what that means, time for Tims new tag! I love participating in these challenges because they give you so many ideas!! I also enjoy seeing what everyone else created, for the tag of the month! I try to go to everyones blog to see there tag and leave a comment. at the end of this year, I want to get all the tags I created this years for Tims 12 tags, and take a picture to look back at my work! For this months tag, Tim used alot of supplies that I do not own...so I had to make-do with what I had on hand. So heres my first tag of 2013!


Heres how I made it!

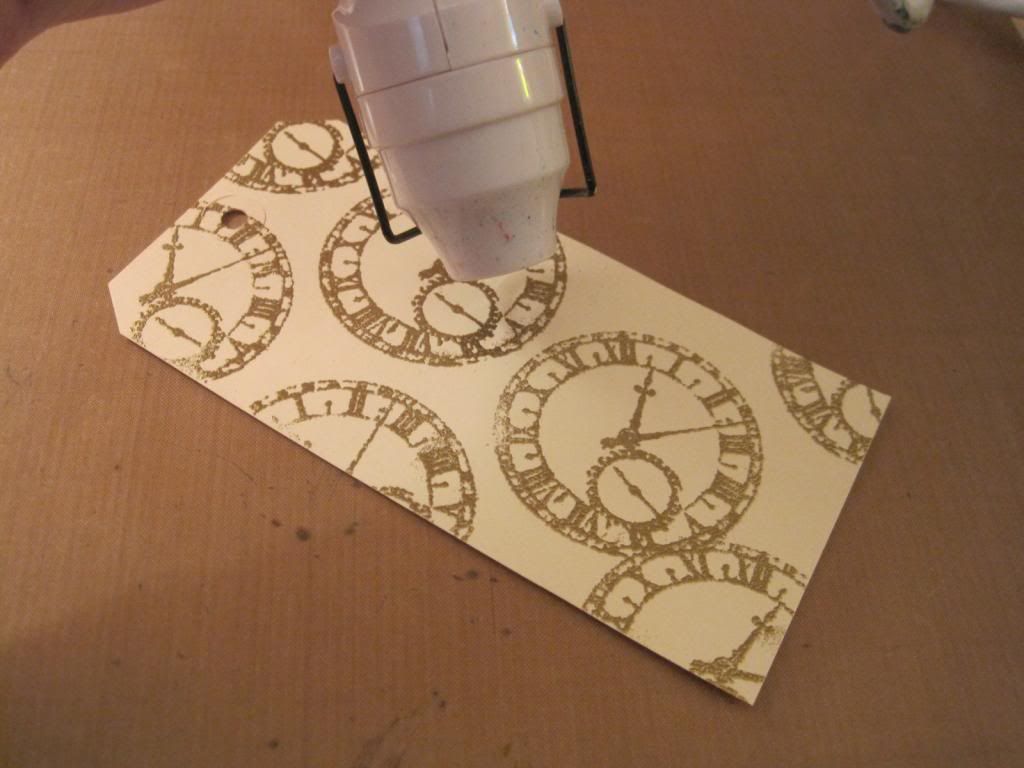
Since I do not own any die cutting machine or a embossing machine, I had to be creative to find a way to a background like tims, but with out dry embossing....Heat embossing! I got out my all time favorite tim holtz stamp, which happens to be the clock ( as seen below) and inked it with embossing ink and stamped it in various places all over the tag. after that it sprinkled it with gold embossing power and heated away! when finished with this stamp, it looked like this below:


the next step is to add some color to this plain-jane tag! im sticking to the blue and orange color palette.. so with this tag..i had a very interesting way of going at distressing this.. im gonna try to explain it as good as I can haha.

  I inked the top half with peacock feathers and the bottom half with salty ocean distress ink. but only around the edges... which left me with a sort of cameo affect in the center. I then sprayed the tag with water to blend together.

next...I diefied distressing rules! I inked my blending tool with tye dye distress ink, and rubbed of some excess on the craft sheet. Then went directly in the middle and blended it in, following the oval shape the cameo affect left us. i continued to blend makeing sure not to put too much ink on the tool because it you did that, you would be left with a stamped rectangle shape from the foam piece going directly on the tag. To add a little more of a orange tint, I added some dried marigold ink overtop of the tye dye. do not stop blending until the tag is completely covered with ink. iflicked some water on the paper to get a few splatters then i went around the edges with walnut stain ink. ( i hope this made since... heres a picture with 4 pictures inside showing you what i mean)  after everything in the background was complete it looked like the picture in the bottom right hand corner.


now its time to embelish!
another downfall to now having a die cutting machine... is not being able to have any of the tim holtz dies, so instead of using the exact same gears tim used.. I actully hand cut them...
 
I used this picture in the link below to make my gears, 
 
 
I picked three gears that i wanted to use and i roughly cut them out and used liquid cement to glue them on to a piece of grunge paper. I used a regular hole punch to jump start holes in the center and in the places that i couldnt reach with sissors without ruining one side. it took some time and patience, but i did manage to cut all three gears out.. and any mistakes? it doesnt really matter haha i call it "character"
 
after there all cut out.. the paper will literally peel off the grunge paper leaving you a blank gear ready for inking! if it doesnt peel off, or u just didnt want to  thats fine! just flip it over, because chances are you will glue that bad side down anyways


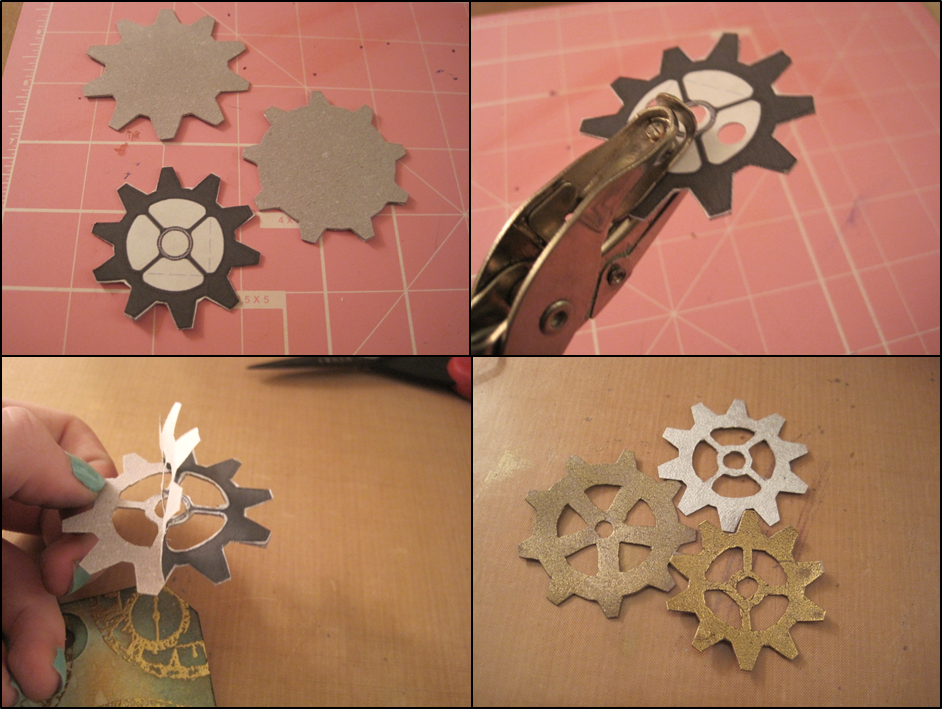
to ink the gears i used 3 different products! mostly cause I only have one metallic distress stain... but they all worked!
the silver one is just a couple of coats of distress stain in brushed pewter
the bright gold one is embossing powder ( the same powder i used for the clocks in the background) i just put embossing ink and powder on the gear and heated it!
the dull gold one is perfect peals in heirloom gold, i put perfect medium all over the gear with a quick dusting of the perfect pearls! and I think they turned out pretty good!
 
 
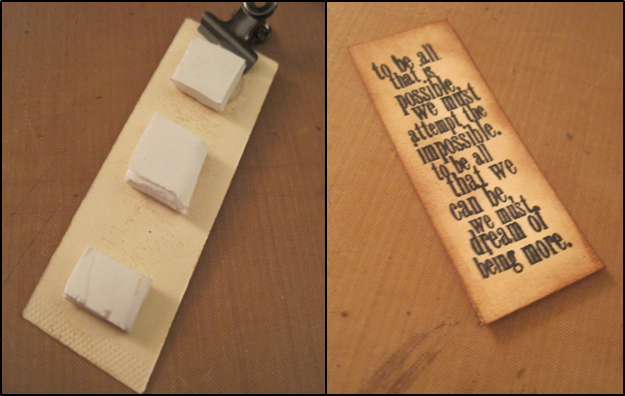
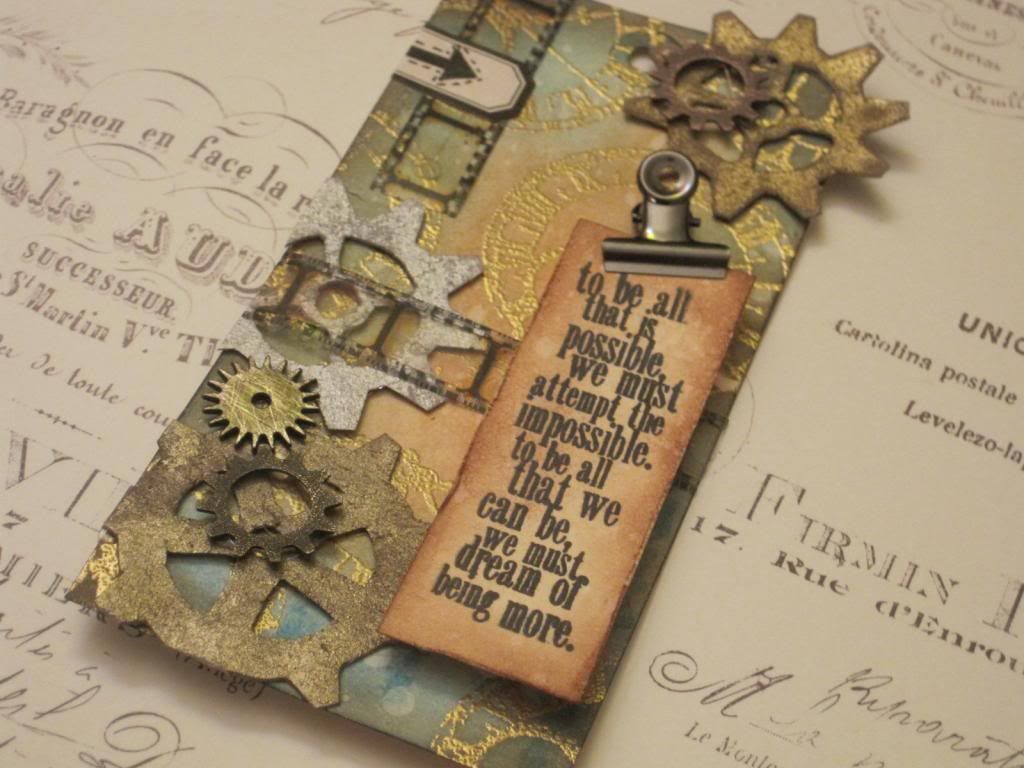
the next addition was this little piece of paper with a saying on it. the stamp i used was the same stamp from the clock set. i stamped it on a spare tag and inked around the edges with vintage photo distress ink then splattered it with water by holding my mister at its neck. i then hot glued three pieces of foam on the back ( i was all out of pop dots ) then glued them again to the right side of the tag. i also had glued the three gears. two were in the bottom left corner and i trimmed those to fit the tag.. and another one was in the top right corner but i didnt trim it, because I liked it sticking off.
 
i added film strip ribbon in two different spots. and at the top i took my new vial labels.. and colored a black label on it and stuck it in the corner. lastly i sanded some metal gears and placed them on top tof the grunge gears and just like that my tag was complete!


thanks you guys!!! I hope you guys have a beautiful day!! if you guys have any questions, comments or opinions... comment below!
 
and i would like to think everyone who leaves such wonderful comments! it means the world to me and seeing what people wrote, they say the nicest things and they really mean alot! they make me smile everyday! 
 
im trying to write more blog posts this year!! more inspriation and more fun!!


Monday, December 24, 2012

Happy Holidays!!

Hello again! I just wanted to wish everyone a happy holiday! I hope that everyone has a great holiday filled with family and friends and of course Crafting! I know that I am going to one christmas party later today, and it will be nice to be able to see how everyone is doing and I Cant wait for them to open there presents, I think I did a good job picking them out this year! my favorite part about christmas is probably the feeling your get of warmth and happiness. Christmas has always been my favorite holiday. I'm still hoping well be able to have a "White Christmas" in the morning, here in Ohio, but its raining right now, so its not looking to good on the snow. I love going on pandora and letting the christmas music play in my art room. it really is good music to get you in the spirit to make last minute christmas cards. I'm going to be sad to take all my Christmas Decorations down. i like having them up because it brightens up everything in my house with all the twinkley lights and colorful ornaments. after there all gone, my house it boring.. and it takes a while to get used to it. but overall christmas will be here again before we know it and we will be able to do all this over again! again, I wish everyone a Merry Christmas And Happy Holidays and A Wonderful New Years!!

Monday, December 10, 2012

12 Tags of 2012- December

     Its that time again! Christmas is on its way and of course, Tim has a December Tag for us!! I was So excited for this tag because winter is one of my favorite seasons, so I just new that tim would have a fantastic tag for us this month, and he did not dissapoint! Instead of one tag.. theres two tag! so i picked my favorite to remake for this months tag. I picked the blue snowman tag because I just loved everything about it! heres a link to tims blog post:
 
http://timholtz.com/12-tags-of-2012-december/

 I am also entering this tag in the Simon Says Stamp and Show contest! if you have not seen this blog you should definatley check it out!
http://simonsaysstampandshow.blogspot.com/
 
Here's the tag I created:

 
and if you want to see how I made this... read below:) additional pictures will be at the bottem


I Started with a plain tag and some broken china distress stain I covered the tag in the stain and sprayed it with water. then I took another tag and stained it with brushed pewter distress stain. after the brushed pewter tag dried, I Put the tag in my Circut machine and cut out three snowflake designs. i used Rock Candy distress stickles to add some glitter to the snowflakes. I also hand cut letters out of grundge board to spell "joy" and then stained them with brushed pewter distress stain, and when dry, used white glitter Glue to add the look of snow at the top of the letters.


I also added some broken sapphire distress stain to the background of the tag to add dimension.
 

Then I stamped the snowman blueprint stamp on to a piece of water color paper and cut it out and colored it in with distress inks with water.
 
Now it's time to put the tag all together!
 

First I glued down the snowflakes and the snowman at the top of the tag, then at the bottom, I layed down a piece of lace and put a piece of tissue tape ontop of that. I Hot Glued the letters ontop of that. then lastly, a piece of glittery blue ribbon and a red ribbon tied at the top to finish off the tag!
and Done!
 
Thats it! Thank you for reading:) heres some additional pictures.


Sunday, October 14, 2012

12 Tags of 2012- October

October is finally here and I cant wait for Halloween! But I have to Say Tims New tag is fantastic! So i wanted to share with you guys my new tag that I created for Times October Tag!

This is my tag! I started it off like tim started his. I covered The tag with the tissue wrap and used paint dabbers to give it color! then I took walnut stain distress Ink and rubbed it on the raised areas. then I took a glue pen and drew a spider web design in the corners and covered the drawings with the new rock candy glitter that I dyed black with alchol inks. I sanded the vintage letters on the sides from idea-ology and spelled out the word " Halloween" finally I added embellishments! I added gears and a word band lastly a idea-ology mini bottle that i filled with green glue that was ment to look like slime.

To make this I took one of the ideo-ology mini bottles and filled it with glue that I dyed green. and to get the glue to drip, I used hot glue and let it run down a plate on my craft sheet. Then I just peeled it off the plate, and craft sheet and stuck it on the bottle.

Heres some additional pictures!


Have any thoughts, questions or ideas? Comment below!
I try to add posts on this blog at least once and week sometimes more!
You can follow me on pinterest also! im ktlove4art
Thank you so much for seeing my posts it really and truley makes my day when someone comments or even visits my blog! I might not have as much views as alot of other bloggers, but the ones I do get mean the world to me! thank you so much and be sure to make your day a great one!

Monday, September 17, 2012

A New Tag!

I made this tag a couple days ago and havent had the chance to type it up! nows my chance so heres a look at my new tag!

 
All the tags I have posted on my blog so far, have a simple design. but out of that simple design makes a beautiful tag that you can change so much details on to make your own. to embellish this tag all I used was a idea-ology word band, a piece of twine, a flower and a little pearl for the middle of the flower. the background on this tag took the most time because theres so many layers. so ill show you how I made this tag!


I started with a blank tag and some distress ink in the colors Vintage Photo, and Peeled Paint.


I used a ink blending tool to blend both of the colors onto the tag. as you can see above, I put peeled paint in those spots, then I blended vintage photo into the blank spaces. after the whole tag was colored with ink, I Built up the color intensity so both of the colors were bold. then, I sprayed the tag with water so all the colors were blended nicely, then i let the colors drip to the side leaving the middle a little lighter than the edges as you can see from the picture below, then I dried it with a heat tool.


Then I took a sponge with lots of interesting texture, and dipped it in one of the new Distress Stains in Brushed Pewter, and I stamped the sponge on different parts of the tag. Then i took the same sponge and dipped it in embossing ink and stamped it on the tag, then I took a gold embossing powder and sprinkled it over the ink, and Heat it with a heat embossing gun. After those steps, the tag looked like this.


Then i used the martha stewart stencils ( regularly used for paints) and i place it on the tag. then i used vintage photo distress ink and a blending tool to transfer the design onto the tag. after this step is down in several areas, the finished background of the tag should look like this below.

( where you heat embossed, the ink wont stick to it very well so it leaves a cool rustic effect.)

Now its time to embellish! I placed a yellow flower on the top left corner and a pearl in the middle of the flower, and used a hot glue gun to glue it down then I used some twine and placed it in a spiral pattern down and at the end of the twine I placed a word band. the finished product looked like this below.


So this tag, super simple to recreate! and the background itself makes a big impact. theres lots of varaitions you could do to this tag just by changing the colors or the embellishments you could have a completly different tag! the next tag will be a little more complex so check back here next time for more!

Thanks for checking out this blog! I hope you come back! were now in the middle of september! i cant belive how fast this year as gone by! I cannot wait till October 1st to see tims new tag!


You can follow me on pinterest! my username is ktlove4art.

Thanks! Heres some more pictures of this tag!


Monday, September 10, 2012

Whats in my Trinket Case?

In my craft room, Ive always thought my organization was pretty good. I use a system of cubes that you can put together to make a unit, and you can find them at craft stores. In one of those drawers, i keep most of my embellishments for projects. I kept the packages for everything so nothing was just floating around in the bottom of the drawer, and after awhile of collecting more and more embellishments, the drawer kept getting fuller and fuller, untill finally I couldnt get anymore stuff in there! So I said to myself, I need a better system of organization.

I remember seeing that Idea-ology came out with a few storage ideas that were made espically for storing different things. I bought the Trinket Case and it looks like this below!


 I filled this case with most of my embellishments and theres room for more! This case is super handy and I can just sit this on on my table and grab it whenever I need it! So I wanted to show you guys how I organized my stuff in this trinket case!


This is what the case looks like after you unlatch the hooks.


This is the first layer of drawers and on the top, I put most of my fasterners that I have, like, some mini clips and some idea-ology hinge clips and hangers.

On the bottom right, I put, what I like to call, my"steampunk stuff" like some idea-ology gears and word bands

And on the bottom left, I put some clock hands and clock faces!


This is what it looks like when the whole unit is open. In the middle on the left I have some foundations and a spot full of metal rings and things of that nature.

On the middle right I only have some vintage letter blocks, and a empty space.

On the very bottom I have some Tim Holtz Idea-ology, tissue tape, ruler ribbon, 2 tins of film ribbon, and some minature bottles. I also have some safety pins.

So thats whats in the trinket case I bought and honestly, I love this thing! It has saved me so much time by not having to dig though a messy drawer and it has saved me alot of space! Love it!

Thanks for Taking the time to read my blog! Thank you guys for all the nice comments on my Tim Holtz 12 Tags of 2012- Semtember entry! Much appriecited! Have a Great Monday!

I was not paid in any way to say that " i love this product" these are my personal opinions and were not influenced my anyone! -Kayla

Saturday, September 8, 2012

My Latest Tag


This is my newest tag! I created this tag a couple of days ago and it was super simple! The background is made from distress inks and the images were just stamps stamped with Black Archival Ink! but you could change this tag and make it you own in many ways. like you could emboss the butterflys with black embossing powder or, you could change the distress ink colors in the background! there are a million possibilities!! i will show you how i created this tag!


I started with a blank tag from ranger, and 3 colors of distress ink in Broken China, Barn Door and Peeled Paint.


I took the Distress Inks and put them on my craft sheet. Then I sprayed some water on the Inks and dipped the tag in the Ink, and swirled it around to get a cool marbled effect. The first layer of ink wasn't very bold, so i built up the color by using my blending tool dipped in the color of ink that wasnt very bright, and added more color to the tag until i liked the way it looked. I learned this technique from Tim Holtz, of course! If you want to check out the video that I watched, to learn this technique, click here!


These are the stamps that I used! All 3 of the butterflys are from the Martha Stewart Embossing Stamp Set that I purchased from Micheals. and the other 2 stamps are from a stamp set I got from Micheals as well. but unfortunatley, I dont remember what that set is called because i threw the package away. I then Stamped all the images down on the tag using Black Archival Ink.


Then I took some twine and made it into a bow, and glued it on! So now, its pretty much finished! its all about final details!


I took some Vintage Photo Distress Ink and distressed the tag around the edges.  I also distressed the edges with a paper distresser. And were done! So this was a pretty easy tag to accomplish! I hope you guys try to make a simpler tag, but "bling" it up and make it look amazing!

Heres a picture of all the products I used!


All of the inking techniques that I used on this tag are from and can be explained alot better by the amazing Tim Holtz! You can check out some video tutorials on the ink techinque on Tim Holtz's Youtube Channel or you could check out Tim Holtz's Blog!